Scanner controls in VistaScan (UMAX scanners)
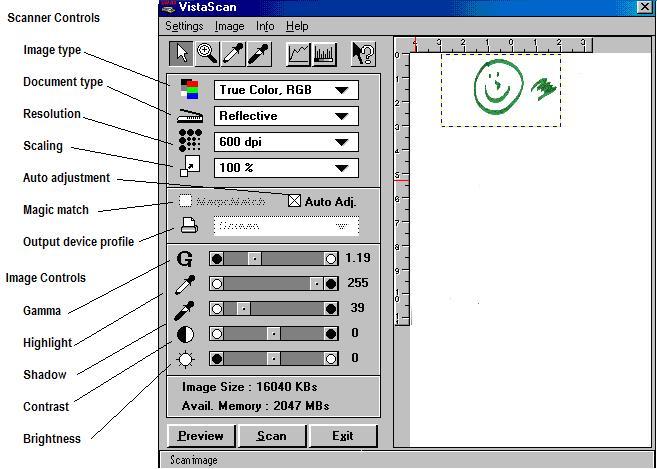
Mostly what you will be changing is the Image type and the Scaling.
Use Auto Adjustment, or try setting the Highlight to the left, Shadow
to the right, Contrast and Brightness in the middle. Leave the Gamma at
the factory default or as it was calibrated when the scanner was set up.
From VistaScan Help:
VistaScan is a pop-up window that runs under certain image processing
and optical character recognition(OCR) packages in Microsoft Windows.
VistaScan contains scanner controls and offers certain image
pre-processing options. Any application complying with the TWAIN
standard can use VistaScan. The TWAIN standard is an image data
transfer protocol developed to allow one software package to use many
devices. Some examples of TWAIN compliant devices are: Flat-bed
scanners, Drum Scanners, Digital Cameras, and Video Frame Grabbers.
Scanner Controls
Image Type Menu
B/W Document
This image type provides the maximum possible contrast to a scanned
image. It does not attempt to recreate shades of color or gray. Each
pixel of the image is either black or white- no grays, no colors. B/W
Document mode is generally the best choice for faithful reproduction of
objects which have only black and white, such as ordinary printed or
simple pen-and-ink drawings. One big advantage of this image type is
the file size when comparing it with grayscale and color image files.
Only one bit of data is required for each pixel of a lineart image,
corresponding to the simple choice between black and white for each
pixel. B/W Document image files occupy the smallest amount of memory of
any kind of image file.
B/W Halftone
This image type uses different combinations of 1-bit black and white
pixels to fool the eye into seeing simulated gray scales. Because this
image type is only 1-bit (like B/W Document, lineart), the file size is
smaller than gray scale or color. The size of the image will be about
the same as images scanned in the B/W Document image type.
B/W Photo
This image type provides accurate representation of black and white,
and gray shades intermediate between black and white, for each
individual pixel. It actually provides just 256 shades, representing
white by the value 255 and black by the value Zero, and representing
the 254 progressively lighter intermediate shades of gray by the 254
values from 1 through 254. The number 256 is the eighth power of 2, so
exactly 8 bits of data are required for each pixel in order to encode
the 256 different shades of gray. A grayscale image provides accurate
depiction of black and white and all intermediate shades of gray. But
the cost is that 8 bits of data are required for every pixel: a
grayscale image file will be 8 times as large as a lineart image file
if all other parameters are equal. It uses more memory and hard disk
space than lineart and halftone images. However, grayscale images are
smaller than color images.
True Color, RGB
This image type uses the same color synthesis scheme used in computer
monitors and television. RGB simply stands for Red-Green-Blue, these
being the additive primary colors. Additive here refers to the
addition, or mixing, of light of different colors: mixing equal
proportions of fully saturated red, green, and blue light produces
white light. This is the way that your color television or color
monitor produces white.
UMAX scanners capture 24 bits of color image information for every
dot(pixel) in your resulting scanned image. Therefore, over 16 million
colors are possible. Resulting images can be truly stunning, but beware
that color images require considerable disk space to be saved.
Custom Setting
This command invokes a dialog box for you to choose other image types.
There are five additional ready-made image types that can be chosen -
FAX, OCR, Web Photo,True Color CMYK and 256 Colors.
Document Type Menu
This setting identifies the type of original document you will be using
for the scan. Select one of the following:
Reflective
Transmissive
Negative
ADF
Resolution
The Resolution setting determines the amount of information the scanner
will capture in a resulting scanned image and is measured in dots per
inch(dpi). The higher the resolution, the finer the image detail and
the bigger the image file size.
Scaling
This command automatically enlarges or reduces the size of an image as
it is being scanned according to your selected scale factor. The
smaller the scale factor, the faster the processing and enhancement
speed, and the smaller the file size. Note: There is
a close relationship between setting the resolution and scaling. The
multiplication of the resolution and scaling settings cannot exceed the
maximum resolution of your scanner (Resolution x Scaling <= Maximum
Scanner Resolution). Scaling factors are dimmed if they exceed the
maximum resolution of your scanner.
Image Setting Controls
This area contains buttons and crolonts for selecting some image
processing options as follows:
Auto Adjustment
In Color and Grayscale image types, the Auto Adjustment facility
provides a simple control to adjust the light and dark
values within the selection frame. If the Auto Adj check box is
checked, the Auto Adjustment tool will automatically calculate
the optimal Highlight and Shadow values for the image inside the
selection frame. When this box is checked, the preview immediately
repaints to show you the effect of the automatic highlight and shadow
levels preprocessing. Note: When you adjust any of the control bars
(e.g. Gamma, Highlight and Shadow, and Brightness and Contrast), the
Auto Adj checkbox automatically becomes deselected.
MagicMatch
It allows you to fine tune the colors of your scanned images so
that they closely emulate the colors of your original source documents.
If you select RGB or CMYK image type and check the Auto Adjustment
option, VistaScan will check for the presence of the MagicMatch color
calibration profile and the Output Device selection will display all
the color calibration profiles in the list box. From the list box,
choose one of the desired profiles, through which MagicMatch will be
applied, to change the colors of the your output image.
Output Device Profile
This selection determines what output device of the image will be sent
to after color matching.
Different output devices require different color calibration profiles.
If you decide and want to send the scanned image to an output device
(printer, monitor...), you must choose the corresponding profile
of that device. Later, after scanned by initiating color
matching, you will have an image similar to the original image.
Gamma Bar
All optical devices such as monitors and scanners have some
non-linearities in their light sensitivity characteristics. To get a
scanned image with good results, VistaScan provides Gamma adjustment
for you to compensate for these non-linearities in your UMAX scanner.
Usually, good results may ordinarily be obtained from your UMAX scanner
by using the factory gamma setting. If you have done a calibration
which indicates a different value as the Gamma correction for your
scanner, you may get improved results by entering the indicated gamma
value.
Shadow Bar
The Shadow value represents the darkest value in an image. All pixels
below this point will be rendered as pure black. If you subsequently
broaden the shadow points, the pixels will be remapped within the new
range thus allowing you to see more detail in an color/gray image.
The Shadow scroll bar allows you to manually and independently set a
shadow level. With a preview image visible in the Preview window,
adjustment of the scroll bar may be made by dragging the sliders. The
default for the Shadow is and 0, this is the maximum range of
brightness levels allowed within any given image. You can increase or
decrease the shadows in a particular image as needed by adjusting the
scroll bar.
Highlight Bar
The Highlight value represents the lightest value in an image. All
pixels above this point will be rendered as pure white. If you
subsequently broaden the highlight points, the pixels will be remapped
within the new range thus allowing you to see more detail in an
color/gray image.
The Highlight scroll bar allows you to manually and independently set a
highlight level. With a preview image visible in the Preview window,
adjustment of the scroll bar may be made by dragging the sliders. The
default for the Highlight is 255, this is the maximum range of
brightness levels allowed within any given image.You can increase or
decrease the highlights in a particular image as needed by adjusting
this scroll bar.
Brightness Bar
This setting determines the overall intensity level (gray level) of an
image. For B/W image, every object pixel which is above the selected
brightness value will be rendered in the output image as white, and
below which every pixel will be rendered as black. For color and
grayscale images, increasing the brightness level, will cause the
brightness level of each pixel to shiftly up by the same amount,
therefore pixels above a certain amount will be at their lightest and
vice versa.
Contrast Bar
It controls the difference between light and dark areas in an image.
Moving the slider on the scroll bar to the right increases the gray
shades between light and dark areas. Moving it to the left decreases
gray shades between light and dark areas creating an image that has a
higher percentage of gray with less pure black and pure white.
[back
to the Agenda]
Diane Berry for WNYLRC 9/29/05